Thursday, May 12, 2011

GS: Stacking Ring(s)

One of my first ever custom jobs was stacking rings... and I haven't had an order for any since. So, it is only apropos to have one of my last custom jobs be stacking rings.

I started with making a very whimsical band with round and modified diamond shapes. While it the shapes seem that they wouldn't stack/fit together well, sometimes you can force the square peg in the round hole and it just works...


I decided to stop at this stage and make a mold. I really liked the simplicity of the shapes and thought they would make wonderful simple stacking rings. Or possibly cool wedding bands. Or maybe the inclusion of flush set stones in the round sections. And the possibilities are endless!

Then I continued on, and finished the 14K white gold ring (below) by adding a prong head, basic engraving to mimic the look of stones in the band and milgrain. Now, this is the first of 4 or 5 rings. The opal is the birth stone of the client's first child, and the plan is to add more rings for future children along with her and her husband's birthstones.


If you notice, the photo doesn't seem shot in my normal style. That is because I used somebody else's light box. We all have our own style. I shoot my pictures in a fabric light box with natural light on black paper. This was in a light box with about 20 different lighting options, a glass floor and crinkled black tissue paper underneath the glass. While it's not my style... and the crinkled paper feels a little 80's to me... it still works to show you the ring.

Thursday, May 05, 2011

GS: The Polka Dot Process, Part 2

Okay... I shouldn't really be calling these polka dots. Polka dots are 'cutsey'... that is not how I would describe these rings. I know the state that they are in now (in this photo) the red gold is virtually screaming adorable polka dots, but that's not the actual intent. This just goes to show how many stages a custom piece of jewelry goes through.


We were going for something more complex... more layered and textured. Normally, when I'm talking about layering textures, I'm usually speaking of fabrics. But you can layer textures in metal too.

For example, anybody can put a satin finish on a ring, there are many different ways to do it. But there is only one way achieve an incredible satin finish... start with a high polished finish. I know, sounds counter productive to polish something only to make the surface matte again. But the polish shows through, adding a wonderful lightness and luster to the satin finish.

And then there are the little details that I like to add in, like cross hatching. Yes, I like to overlay my satin finish in different directions, which I feel adds not only another layer of depth but allows the light to reflect off different areas at different times.

Now, in the image of the vase, you saw this wonderful geometric pattern spread across the vase. It seemed sporadic in some areas and carefully plotted radiating circles in others, all creating a wonderful final 'layer' for this vase. For our purposes, in jewelry, we needed to find a way to recreate this layer.

We played around with the idea of drilling the holes (but that looked a bit Swiss cheese), half drilling the holes, using a ball bur (which reflected like little diamonds and not the look we were going for in these rings), using a ball bur with a hammer finish on top... and a few other ideas. Nothing seemed to fit, they were all TOO geometric, not organic enough. Then the decision was to go with selective planishing...


And finally, to complete the rings, both rings had to be finished first to a high polish and then brought back to a satin. And this is the final pair of rings...


They are not polka dot anymore. They are complex and subtle all at the same time.

The reason I wanted to share a lot of information about the process of building these rings is because even though they look like simple wedding bands from a far, a great deal of time, thought and effort went into every step designing and fabricating them. I think this point is lost on a great deal of people... they are not just spit out of a machine or picked up at a mall, these were labored over.

And, in my humble opinion, these are not just wedding bands but small pieces of art.

Wednesday, May 04, 2011

GS: The Polka Dot Process, Part 1

It all started with a picture of a vase by Kitamura Junko...


There is so much to say about this beautiful piece. The geometry, the pattern lay out, the layering of color and texture... just amazing! So we had plenty to work with.

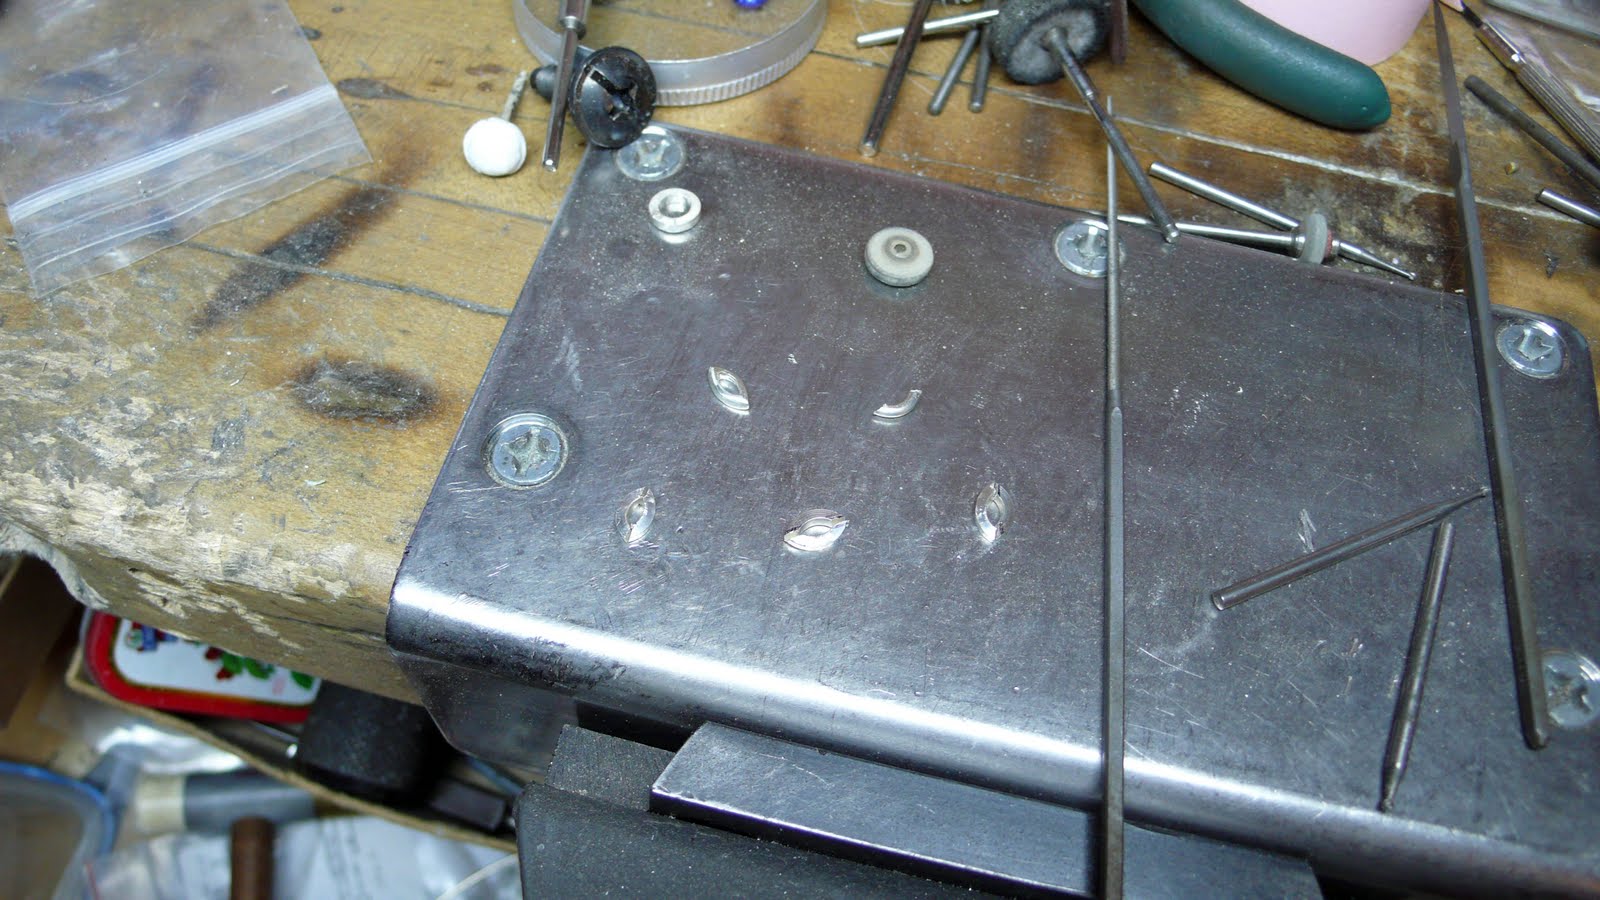
We started simply with an 18K white gold ring and 18K red gold wire stock. I had to carefully drill each hole directly through the ring (to make each dot visible from the inside and outside) just a hair smaller than the wire to be inserted. The reason is because the tighter the fit, the better the solder joint.

Now, you're probably wondering how you make the wire fit into a hold with a smaller diameter. Simply put.. you taper the end and hammer the hell out of it till it fits.


I proceeded to drill all the holes in the ring and lay out the 3 sizes of red gold wire in preparation for soldering...


While it was technically soldering the pieces together, I would actually consider it more of welding. The reason being is because the flow point of the solder is very close to the melting points of the two metals.

I used 19K white gold solder which melts at 1670 degrees. 18K white gold melts at 1730, just over the solder flow temp, and 18K red gold melts BELOW the solder flow temp at 1655. This is why the end of the red gold are melted after soldering...


This is also why I had to leave an excess of gold wire for each dot. Seeing the melting temp of the red gold was below the flow point of the solder, I needed that little extra red gold material for melting. If I had each of those wires cut flush with the white gold ring and then attempted to solder the pieces together, there would be a very good chance that the dot would actually melt and leave a divot at the top surface. And if that did occur, I would be forced to remove quite a bit of the white gold band to meet with the lowest points of the divot... or even worse, have to flow red gold solder into each divot to attempt to fix any mistakes.

But thankfully, with taking a great deal of time preparing, the joints cleaned up beautifully...


I have to admit, I have always wanted to make polka dot rings...


But we aren't quite done yet! To be continued...

Monday, May 02, 2011

GS: Compass rose ring

I have always loved the idea of a compass ring... you know, to help you find your way home. And I don't know how many different clients I have suggested the idea of making a compass rose ring, but apparently they don't get lost as much as I do ;)

I think an antique map with an ornate compass rose is beautiful...


Well, I finally found the perfect client! While this isn't quite the ring design I always envisioned (I wanted to do a little more detail, red gold inlay, engraved fleur de lis, etc) but I think this is clean and simple... and delightful!


This compass rose ring is in palladium with a collet set rhodolite garnet and hand engraving.


Saturday, April 23, 2011

ME: The Eight Way Tie

As I mentioned before, it is amazing how much "stuff" goes into a chair... literally. Well, not so much newer chairs (most are just plywood with foam glued to it) but my antique chair has guts.

So, I started with the chair frame...


(it looks so tiny... and empty... and a little sad.)

Then I stretched the webbing and tacked it on...


Now... this was one of those points where I ran into an issue and we had to change things up a bit. Because the wood is so brittle and, well, dug up from being upholstered multiple times, I had to move to staples. I really wanted to do things the old fashion way (tacks) but they kept popping out. So, I modernized a bit and moved to staples... lots of staples. And then I added a few extra straps of webbing and attached them to the side of the frame for just that little bit more support.

Next, I added my NINE seat springs (my instructor, Seymour, said the person who made the chair must have had stock in a spring company, because there was no reason for nine giant springs in this tiny chair) and used a clinching tool to attach them to the webbing. From there, I started my eight way tie...


First was back to front. Next was left to right...


And finally, the diagonals which makes the 8 way tie ...


(Notice the front spring is tied in 8 different locations... that's where the name comes from.)

When dealing with the back (which only had 6 light springs) you don't have to do the full eight way tie, just four is sufficient since it carries less weight than the seat.


And there you have it! The beginning guts of my chair!

Thursday, April 21, 2011

ME: One of These Things is Not Like the Other

It's been a while since I have updated you on the chairs... which are going slow but steady! It's tough with only a couple hours a week of class time to work on them, but they are coming out great and should be completed soon!

We did run into an issue, tho. It's a minor issue, but I know it will drive me nuts for the rest of my life. So, let me back track a bit.

I found the chairs at a Goodwill, looking very 1950's. And then after I started stripping them fabric off them, we found out they were from the late 1800's to early 1900's. Major clues came from pulling out materials like horse hair and straw, but also the condition of the wood.


See how (1) dry and (2) damaged it looks. The chairs have been upholstered and reupholstered many times over (the holes are from where the tacks were pulled.) Dealing with the wood in this condition takes a bit more finesse, creativity, problem solving and time. And, to be honest, this should be the last time they ever get upholstered (that's a lot of pressure for me to get it right.) They had already been repaired probably in the 1950's - 1960's or so when last upholstered (notice the lighter, more solid wood added in for support)...


So, after seeing this, I had to try to figure out how to refinish the legs. I didn't want to use stripper, in fear of damaging the wood further. That meant good old fashion elbow grease and sandpaper (sigh.)


And it took quite a bit of time since front legs were covered in some type of milk paint while the back legs were covered in schlack (probably home made including who-knows-what in the mixture.) As the sanding went on (and I worked on one chair at a time) I realized the front and back legs were different woods (one was possibly better for turning for the decorative legs?) At this point, I named them "Frankenchair 1 & 2" and decided I needed to give them a bit of a color to tie the legs together.

I decided to go with a pickling finish, to lighten it up and kept some of the dark paint/schlack in the groves to show the age. As I went to finish the chairs (still working on one at a time), I noticed the two were taking the finish differently. I just couldn't figure out why. And finally... FINALLY... I happened to put the chairs next to each other and what did I discover...


THEY DON'T MATCH! One chair (left) is nearly 2 inches taller than the other and made from different woods. HA! I have no idea if they were intended to match or made at different times or what.

Sooo... what to do, what to do. If they were different, yet similar, fabrics I could live with them as a pair. But I already purchased so much fabric, I can't justify buying more. And after much discussion with Sal, I decided I will break up the pair and sell one when I'm done. So, if you are looking for a fully restored antique chair finished in a French Country style, let me know! If not, I'll put it on consignment in a local decorators shop or something or maybe on Etsy.

But this is still a fabulous adventure! And it is really helping my understanding of the craft because I'm working on one at school and repeating the steps on the second at home. And I'm tempted to mix it up a bit, play around with the 2 fabrics, and see if I can come up with a slightly different design for the second chair. But I'm not sold on the idea yet... we'll see!

More photos soon!

Monday, April 18, 2011

GS: Noodling Around

Think back... what was the first piece of jewelry you gave your mother? (And jewelry that another family member paid for doesn't count.)

Nine times out of ten, it was a macaroni necklace. And even though you painted it green and covered it with glitter, and turned your mother green and covered her with glitter, she wore it with pride. Well, it's time we bring it back... just a more adult version (and it won't turn her neck green either.)


I'm very excited to introduce, just in time for Mother's Day, my macaroni necklace! It's simple, it's whimsical... it's a gold elbow macaroni. Just the idea of it makes me smile!


Now... if you want to make EXTRA fancy (come on, it's for mom... of course you want to make it extra fancy!) you can add some glitter. And by glitter I mean flush set diamonds.


Or make it into a true "Mother's Pendant" and flush set the different birth stones.

I am offering them in my Etsy store, and they are made to order! They are available in 14K or 18K in yellow, white or red gold. If you want them by Mother's Day, place your order by April 25, 2011 for a pendant with stones and by May 2, 2011, for a plain pendant. And until Mother's day 2011, I am offering them at a discounted intro price.

So, get one for the special mother in your life. Or anybody that will appreciate the joy of wearing an elbow macaroni. Better yet, get one for yourself.

Tuesday, April 05, 2011

ME: Breaking it DOWN!

It's amazing when you rip apart a chair. Not only for the fact that it's cathartic, but that when you break it all down there really isn't all that much to this piece of furniture.

So... we started with this...


And after a couple of hours of ripping you end up with this...


HUGE DIFFERENCE!

So, when you get down to the nitty gritty of it, an upholstered chair has a very basic wood frame. That's it. It's hollow and empty in the sense of space...


... but so full of potential!

I have been slowly building back up the chairs and it's amazing when it starts to actually LOOK like a piece of furniture again! More photos soon!

Friday, April 01, 2011

GS: No More Custom

Well, after a great deal of thinking and talking with Sal, Green Spot Studio will no longer be making anymore custom jewelry.

Right now the cost of precious metals are insanely high and I'm having issues finding a balance between providing clients with a decent price and making enough income to keep my business afloat. And, to be honest, weeks go by without sitting at my bench (hence the lack of photos and posts.) I find myself spending about 40-60 hours a week meeting with, emailing with and talking to clients about money.

I can't tell you how many pieces of jewelry I have designed, at no cost, that never get built. I have even reached the point of agreeing upon a price, sending out contracts and invoices and then never hearing from those clients again. And, honestly, it has all just beat me down. I've always prided myself in being an artist first and a business woman second and all of this has made me despise my craft.

But don't worry, I'm not closing my doors. I'm just changing this up! You always have to keep reinventing yourself if you will survive in this business! So, I will continue making the pieces I sell on Etsy and maybe work on a small line? Who knows, only time will tell.

You should still expect some jewelry photos over the next couple of months while I'm finishing up all the jobs I promised to do (a couple wedding bands, some engagement rings, etc.)

Now, I'm sure you are wondering what will become of this blog? Well, I think I'm just going to start blogging about the new adventures that are in front of me! I'll keep posting on the process of my chair, maybe some cooking, of course lots of Jupiter photos... and possibly a few other big adventures.

So... stay tuned for new and fascinating adventures in my shiny & sparkly gem of a life.

Tuesday, March 29, 2011

GS: Don't Take Things Too Literally

I had a client that came to me with the idea of a Celtic knot ring. I loved the idea, but refused to just carve a Celtic knot into the shank. It would make the design (1) too obvious and (2) it had the strong possibility of looking dated over time. So I had to come up with a creative solution. And after some thought (and some creative license), I decided that I would fold the Celtic knot in on itself and turn it into the head to hold the stone.


Once we agreed on the design (of basically I told him that he agreed with the design... and he had to trust me, which he did) I went right into building it! First I built the loop prongs...


... And then I forgot to take more photos until I was soldering the shank to the head...


... And then stone setting...


And our finished ring...


The final piece is platinum with a 2 ct diamond cut color change sapphire.

Thursday, March 17, 2011

GS: It's Facebook's Fault

Okay... I'm done apologizing for being a slacker about blogging and am attempting to figure out why I haven't been posting at all. And I finally figured it out... it's Facebook's fault. And Twitter. I started updating those (status, photos, stories, etc) and I just totally became a slacker here. BUT NO MORE! Or at least I'm going to try my hardest to start ignoring that stuff and paying more attention to my shiny followers.

Anyway, I just got back from a couple weeks of vacation (Hawaii & San Francisco) and feeling very very creative! Sooo... expect lots of fun new projects!

Sunday, January 30, 2011

ME: Learning Why Upholstered Furniture is So Damn Expensive

Another damn snowstorm, a class canceled. Just one of those things to get used to when living in New England. But even without class, I still got a few things accomplished this week.

The first thing I managed to squeeze in (between snow storms) was buying the basic supplies to start upholstering the chair. My first stop was New England Upholstery Supply to pick up my magnetic hammer, tacks, jute, ruby twine, foam, muslin, and a bunch of other stuff. That first stop was pricey, around $250, but I bought some expensive tools and supplies for both chairs (and enough for probably a 3rd or possibly a 4th.)

Then I headed up Zimman's in search of the perfect upholstery fabric. The great thing about Zimman's is the fact that they sell designer fabrics to the public and for reasonable prices. Now, the interesting part is that Sal wanted to come join me because these will be living in our house and he, well, questions my style. After 2 hours and a time-out, we picked the fabric.


We went with a natural tone heavy woven cotton (similar to a linen weave) with French script fabric and a complimentary deep tea colored linen for the seat. Total on fabric... $200 for 2 chairs (the top of my budget.)

The funny part is the fact that I was a little worried about the French fabric being too busy. I would hate to do all this work and be sick of the chairs by time I was done. Well, while doing a Google search for 'fabric chair' to just see what is out there, I came across an image of the fabric I bought! So, when I clicked on it, I found this...


... an ENTIRE chair upholstered in the fabric! And it's not horrible! It's actually really nice! Very classic, rather neutral but still whimsical.

And it's an $850 chair to boot! So, I can't feel so badly spending $30 for my two chairs plus another $150 each in materials.

I did get a little more work done, but that's for another blog post.

Wednesday, January 26, 2011

GS: Little Bits of This & That

Along with the engagement rings and pieces from my Etsy shop, during the holidays I got a few orders for some small custom pieces. They are all very specific to the clients that they were made for, as are all of my bespoke pieces, but these few pieces had very particular subject matters.

My first was a pair of sterling silver dragon cufflinks. The dragon pattern was designed to be an "S" shape for the client's name. We went with a distressed/antiqued finish to give it that Mortal Kombat vibe. I think we were successful!


Next was a gold pendant with the profile of a Newfoundland dog. A high polish finish on top an engraved pattern helped create a natural texture. Also, the pendant has a tear drop bail hidden in the back to accommodate multiple sized chains.


And finally, a pair of 4 leaf clover cufflinks. Simple and clean in sterling silver... and hopefully lucky.


Don't be surprised if you happen to see these offered on my Etsy page for Saint Patty's Day!
Locations of visitors to this page