Wednesday, October 05, 2011

GS: Coming to the End

We're down to the end of the jobs... which means the end of the jewelry photos. But don't be sad, we still have a few more photos left!

This is a wonderful set of knife edge bands. But, as you can tell, the woman's band isn't actually a knife edge. But it has tapered outer walls, mimicking the knife edge of the men's band, but just a little more "blingy" in the middle.

Both bands are platinum. The woman's band has 3mm VS F diamonds equaling about 2.1 tcw.


If you can't tell, I have a new camera. And, obviously, I don't have the settings down yet. But I think you get the idea!

Monday, October 03, 2011

GS: The Website is Down

If anybody has attempted to go to the Green Spot Studio website, you may notice that it's different. Apparently, it was hacked. It looked fine if you typed the web address in directly, but if you Googled "Green Spot Studio" there was a notice that the site was compromised. We actually wouldn't have noticed it if it weren't for a few emails from clients. What happened was somebody came in and put a bunch of image files into the site. Because the images were imbedded all over the site, we actually had to delete the entire thing (fingers crossed that I still have all of the images saved somewhere!)

We had been intending to build a new site, but put it on the back burner when I decided to close the business. But since I am hoping and planning on opening up my doors once again, down the road, I do want to keep a portfolio online. So, over the next few months, we will rebuild.

And I know that everybody likes looking at the pretty pictures... so don't worry! They will be back online again soon!

On a personal note, there is so much big stuff going on that I will share soon! There will be all kinds of new fun stuff coming up to blog about!

Sunday, September 04, 2011

GS: Fingerprints, Part 2

When the palladium rings were returned to me, I was pleased to find that the finger prints survived the casting process. But I knew I had to handle the rings with the utmost care during the finishing/polishing process so not to disturb the fingerprints. Normally, I would use various types of files, emery and rubber wheels inside the rings to take off the top surface after casting (to remove any surface pitting, texture, etc) to create a smooth surface for polishing. But in this case, I had to clean lightly around the fingerprints, not touching them at all, and then I tumbled the rings for an extended period of time.

By tumbling the rings, it would not only remove any rough/sharp areas in the fingerprints while still retaining the pattern, but prepare the rest of the metal for final polishing.

And these are the final pieces.


When off, the finger print is clearly visible. But when worn, nobody else needs to know that they are there. The perfect little secret... more personal than most engravings.

And I was thrilled that my experiment worked!

Thursday, September 01, 2011

GS: Fingerprints, Part 1

I have had so many inquiries about "Fingerprint" rings, which is the person's fingerprint imbedded into the ring (normally on the outside of the band.) But after I explain the process, nobody seems to want to go through with it. Until now.

There are a few different ways that jewelers make fingerprint bands. You can scan in a fingerprint and laser engrave the fingerprint, but I this process too mechanical and perfect. You can have the client sink their finger into clay and once the clay hardens, use that as a mold to melt wax into, but that can leave a rather faint imprint in the final piece. And then there is the way I decided to do it...

First, I lined the hard green (high melting temp) wax with a purple repair wax (low melting temp). Then I cut the rings in half (because they wanted to have the fingerprints on the inside of the rings.) And then I burned my fingers holding the wax over an alcohol flame to soften it up...


...for my client to SINK HIS FINGER INTO THE HOT WAX!


... e Voila! Wax imprint! (That is the fingerprint of the groom to be on the inside of the band of the bride to be.)


And then I make the bride to be repeat the process...


Then I had to reconnect the bands in the wax, do some light cleaning and have them cast. We actually did practice waxes to make sure the process was going to work, so if the casting didn't come out, I had backups.

Final ring photos later!

Wednesday, August 17, 2011

ME: Lino's Chair, Day 2 & 3

Just a quick post to show you what I've been up to. And, honestly, the pictures do not explain the amount of time and work that is going into this chair!

First I started building back up the head rest...


And then I covered the arms...


Then I had to work some magic to create the separation between the headrest and the back...


And this is where I left it...


And there is your sneak peek at the fabric for the chair.

Now, I'm sure you are thinking that doesn't seem like I've gotten that far... but trust me, this chair has been so much work. We actually had to do some re-designing today because the original spring cushion died on me. I didn't notice when I took it apart, but once we started to look at it we noticed that the structure had snapped in about 15 different places and there were sharp shards of metal over the entire thing. So, I need to build a deck to accept the new foam cushion. Oh well!

The funniest part is now that I'm finally onto my fabric and it's looking like I MAY finish by the end of the day on Friday, my instructor Seymour informed me that he didn't want to tell me on the first day, but I brought the most difficult chair... ever. And it would normally take him 4 days to do it, so I should be proud if I manage to do it in 5.

Keep you posted!

Tuesday, August 16, 2011

ME: Lino's Chair, Day 1

Just a quick post of what I accomplished on day 1 of upholstery boot camp!


I know it doesn't look like much, but it was time consuming. It should start looking more like a chair by the end of today! Off to class!

Sunday, August 14, 2011

ME: My Idea of a Vacation

My goal was to be done with everything in the jewelry shop by today. Well, that didn't happen. I got nailed with 3+ days of migraines last week which just pushed everything back... but honestly, even without the sick days, I'm pretty sure there was no way in hell that I would have been done.

Oh well, everything will hate to take a little longer since this is a vacation week for me. I signed up for a one week intensive upholstery class at the Eliot School. Yup, only I would do manual labor for a vacation.

My project for the week, Grandpa Lino's chair.

It's looks like a recliner, but it's actually a rocker. And in mint green vinyl...


A god-awful ugly chair that is so damn comfortable, I just can't bear to part with it.

I decided to get a jump start on the chair and strip it before the class started. The inside of the fabric was stamped with the date of 1963, which answers a lot of questions as to why Lino would go with mint green vinyl.

As I stripped it, I had all kinds of goodies falling out of the chair...


It was full of pocket change, nails & screws (being a carpenter, I'm sure Lino's pockets were filled with things like that too), pieces to what I can only imagine was from the game Battleship, and a few other random things...


And after a couple hours, we have a naked chair...


I had to do a little gluing & tightening, but I think it's stable enough to start putting it back together again. More posts to come...


Sunday, August 07, 2011

GS: Reinterpertation

Over the past few years, the most common inquiry for a wedding ring has been the Nouguchi Inspired Men's Band. But this time a client asked for a version for a woman... more delicate and blingier. This is my reinterpretation...


Wednesday, August 03, 2011

GS: It's Worth Whhhaaatttt?

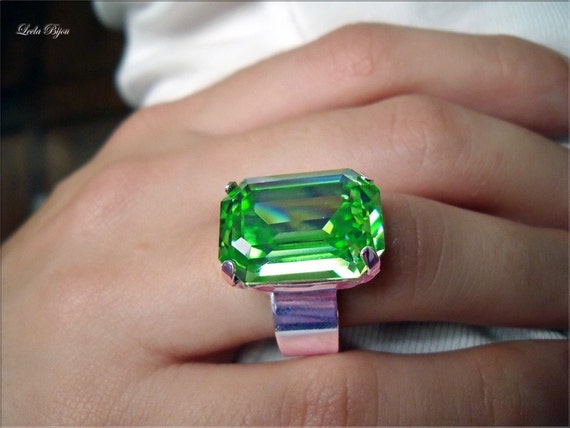
This morning I was up at 4AM with an itchy pup (poor Jupiter got attacked by mosquitoes on a hike the other day) and I thought I would just flip through a few of my favorite sites and see if there was anything new. As I clicked on Etsy, I spotted a giant green stone ring for $50 in the 'Handpicked Items" on the front page...


So, I clicked on the listing to see the materials/information:

"MEASUREMENTS
The size of the cabochon is 0.7 inches (18 mm).
This ring is adjustable.

► It´s made with great quality materials, I only buy from official suppliers of Swarovski components for my work."

I have a few questions/concerns.

First off, that's not a cabochon... it's an emerald/octagon cut faceted crystal.
Second, if this is made out of sterling silver & Swarovski crystal, how is it only $50?

Since I couldn't sleep, and I couldn't really get work done at 4AM because I would have woken up Sal, why not research the materials and pricing.

So, I started with the setting, and I found a similar sterling silver setting on one of my vendor's sites for $22.00, with a bulk price of $18 for a dozen or more. The one I found is probably a bit heavier, so I will guess this Etsyer got theirs for around $15 each.

Next I moved onto the HUGE Swarovski crystal. I checked out the site of one of the largest jewelry supplier in the country. The largest emerald/octagon cut Swarovski was an 8x10 mm and was $32! Wait! What? Now even if they bought 144+, the bulk price is still $25.25 each, and this is still way too small! I can't even find 18mm Swarovski emerald crystals, so let's just toss out a ballpark price of $30 each for bulk pricing of these.

So, that's $15 for the silver setting and $30 for the stone. And don't forget, there's packaging, so add another $1.00. So we're totaling $46. And they are charging $50. A $4 profit? Really? Oh, and don't forget that while these are made from 2 pieces to assemble, so there is some minor labor, I'm still shocked that there is only a $4 profit to be made.

If we want to take this one step further, the average salary for a bench jeweler is about $20-40k/year (depending on if it's a mom & pop shop or a larger named jeweler), so it would take selling 5,000 of these to these to just barely make a living. Which leads me to believe this is a side business and makes them on the couch while watching tv after work.

But this is the kind of jewelry that is forcing me close my shop. How can I compete with that pricing? This is a full time career for me, and I cannot make $4 profit on pieces (even thought there have been plenty of times I have lost money on jobs.) But this is what people are looking for... bargains.

So, for my final thought, if she's being honest about all of her materials, it's an incredible deal, go grab one. It's just too bad that she has to under price by so much that it reflects poorly on jewelers that are fighting to make a living. And... if this person is anything like me... they will probably burn out really quickly by saying their time is only worth $4.

Tuesday, August 02, 2011

GS: Please Don't Lose Your Ring

After all these years I had my first client lose their ring. I've gotten the few panicked calls over the years, but they always ended with finding their jewelry in places like the vac, the carpet, in the couch, in a pocket, the backseat of the car, and other random places. But Memorial Day this year I got my first lost LOST piece.

Now, you all know that I'm closing up shop, but they managed to sneak in a remake (and matching wedding bands) before I pack it up. But anybody past this point won't be quite so lucky.

So, do me a favor and have a place that you always put your jewelry. For example, I have a few different holders for my wedding ring...


While I am not one to have lots of tchotchkes (well, yes, clutter, just not tchotchkes) but I have an Eiffel tower that sits in my kitchen that became my ring holder while I cook or do dishes. Actually, I have two, a large and a small one... Sal uses the large one for his ring.


On my nightstand I have the classic ring holder... the elephant. I found him on Ebay for $2.00 and I love him. He holds a couple rings on his trunk and some other stuff in the dish around him... all while being adorable.


In the shop I have the "green guy" that Sal bought me to hold my glasses. While I pretty much never put my glasses on him, he holds my ring perfectly on his nose.

If I ever misplace my ring, 99% of the time find it in one of those 3 places. Another thing that I recommend to all my clients, GET A SAFE! Yup, just go buy a cheap safe over at the hardware store and screw it to the floor of your closet... similar to a hotel safe. And it's not just good for jewelry, it's also great for passports, personal & financial info, etc... here's one that's probably bigger than most of us would need and under $100 bucks! And, if you are a client of mine, I'm sure I gave you the "insurance" talk.

So, the moral of the story is have a safe place to put it when you take it off and DON'T LOSE YOUR JEWELRY BECAUSE I WON'T BE ABLE TO RE-MAKE IT.

Wednesday, July 27, 2011

GS: Pile o' waxes


I am so close to finally being done in the shop that I can almost taste it! I have 2 last waxes to carve and a bunch of things finish & to set stones in... but I am so damn close! Which is good since gold hit $1625 and I can scrap out what I have left kicking around the shop. And soon the shop will be in boxes & I can easily say no without the guilt of thinking "Well, what will one more job hurt?"

The only problem now is that I don't know what I'm going to be when I grow up. Never thought I would be 35, still paying student loans from my last round of college & wondering what to do next. If anybody has any thoughts, let me know!

Monday, July 18, 2011

ME: The FINAL chair photos!

Okay! No more dilly dallying! The final chairs!

We started with this goldenrod yellow beauty at the local Goodwill...


... stripped it down to this...


... and built it back up to THIS...


We took a 1950's nightmare (with incredibly itchy and possibly highly flammable fabric covered w/ stains, springs popping out, etc) and ended with a fully restored French Country style complimentary pair of slipper chairs. If you want to see the entire process again, take a look at these blog posts...

1. Changing Things Up
2. Breaking it DOWN
3. One of These Things is Not Like the Other
4. The Eight Way Tie
5. Finally Starting to Look Like a Chair
6. Building it Back Up

The reason I decided to make them complimentary was because (if you remember from this post) once I stripped them I realized that the didn't quite match. I decided to go with my gut and make them similar but with slight differences because I knew I could never force them to be identical, no matter how hard I tried. And while others may not see the differences, I would and it would drive me out of my mind. Plus it gave me an opportunity to be slightly more creative and play around with the design a bit. I have caught a bit of flak from somebody who is in the decorative business and thought my choice was poor because you could have put them on 2 different sides of a room and never seen the difference. But the choice was mine, so I decided to go the more creative and playful route.

So... were they worth the wait? You tell me!

Now, the difficult part, I think it's time they find a home that's not mine. Just know, I did not set out to restore these chair with the intention of selling them. But one of the first things you learn in art school is to disconnect from your work so you are able to sell it. And from years of making custom jewelry, apparently I got really good at enjoying the point when I hand something off to its new owners. And while I loved the process of restoring and upholstering these chairs, I feel like they will make somebody out there really happy. And when my work brings somebody joy, well, it makes all the time and effort worth it.

How am I going to sell them? Hmmm, not sure. Etsy? Maybe. SoWa market? Maybe if a friend will let me put them in their booth for a day. But for now, let's see if anybody here would want a pair of French Country Slipper Back Chairs. If you want any information, drop me a note at the Green Spot Studio Contact page. I would prefer not to break up the set, but if somebody really only wants one, I am willing to talk.

Now, I am taking another upholstery class and this time I will most definitely be keeping the chair. The reason, because it was my Grandpa Bonfiglioli's chair. But that is a post for a later date.

Sunday, July 17, 2011

ME: Building it Back Up

For those who have been wondering (and those who have been asking) the chair has been done for a while. Actually, both the chairs are finished. I just needed to take the time and set the scene to get some nice photos of it. And if you have ever seen my apartment, you know (1) I have very few empty walls, (2) very few walls that are straight [since we're basically in an attic] (3) horrible lighting (4) and more clutter than you can imagine [that's what happens when you have 2 people living in a very small space that has more hobbies than you can count.] And I finally did that this past weekend. But those are not the photos I'm going to share today... I want to show the final stages of building it back up! And I don't want to drag this out anymore... so we'll just plow right through this!

So, if you remember, we had a chair covered in muslin. Now it's time to show how we added the final fabric. We started with the seat...


And with some sewing, tucking, tacking and stapling we have a covered seat (I also added a little kick pleat skirt, but that came later)...


And then we moved onto the chair back...


And added some lovely "sunflower" details to enhance the slight curve of the slipper back...


Then I cut the back panel and used multiple methods to attach it including staples, hand stitching and ply-grip...


And finally, the the cambric (dust cover) on the bottom of the chair...


And I know at this point you are dying to see the final product. Well, tough... you'll have to wait till tomorrow. OH... THE ANTICIPATION!

Thursday, July 14, 2011

GS: Ring of Fire

I feel like such a slacker for not posting for a whole month... but I have actually been getting a good amount of work done. A good amount of the pieces are repeats, but there were a few new designs.

I had some clients come to me and told me how a friend described their relationship as a "Ring of Fire" and wanted to have that reflect in their wedding bands. We went through multiple versions from very bold and literal but ended up with something much more subtle.

The design I came up with had the literal flames but hidden inside of a classic scroll pattern to create a whimsical design.


And the final piece was 2 tone 14K Red and Yellow (to give it the coppery warm glow) with a hand engraved pattern...


Wednesday, July 13, 2011

GS: Just when I thought I was out...

They pull me back in (said with clenched fists.)


That famous line from the Godfather couldn't be more true in my life right now. The past couple of months I have been working on closing my custom jewelry business (which I am referring to as a "Sabbatical" because hopefully some day I will open the shop again) and it has proven to be way more work than I would ever have imagined. And I'm finding it mentally exhausting (hence no blog posts.)

I put an end date of May for taking any new custom jobs and I have been very good about sticking to that with strangers... but I'm a sucker for my friends. Give me a sob story, tell me you love my work, tell me that you can't imagine getting your wedding bands from anybody but me, and I'll give in. And while I hesitantly say yes, and love you dearly, it pretty much sucks.

It took so damn long to come to the conclusion that I was taking this sabbatical, that I really want to be done in the shop. I want to move onto the next chapter... whatever that may be... and I'm currently stuck in a horribly messy shop limbo. Honestly, I think it's more work attempting to close the shop than it was trying to keep it open!

But I finally took my ABSOLUTE LAST JOB! And I had a fabulous past client (who I kept as a friend) come to me begging for an engagement ring for her brother in Trinidad. I first said no... but then the compliments started flying and that damn cute accent and my head started spinning and before I knew it, I said yes to ONE LAST JOB. I did set some ground rules though, I show a few designs I had tucked away in my book (for a rainy day) and whichever is the right direction, I can just go ahead and build.

So... the end is in sight. There is a light shining at the end of the tunnel. Still don't know what's on the other side, but I can't wait to find out!

Friday, May 27, 2011

GS: Etsy Treasury

Happy Friday!

I woke up to an email from Etsy telling me that my upcycled Lemon Ring was featured in one of the Etsy Treasuries. Cool! Go ahead and take a peek!


But it seeing it with all of the other listings, I realized I need to photograph my Etsy stuff with bright colored backgrounds. My fine jewelry looks nice on a dark background, but whimsical pieces new to be fun and bright!


But that's a project for another day. I'll just be happy that somebody likes my ring ;)

Thursday, May 19, 2011

ME: Finally Starting to Look Like a Chair

I haven't done a chair update in a while, which is bad on my part since the chair is nearly finished.

So, last you saw we were up to the eight way tie, I have made some good progress since then. It is really amazing how my empty little wooden box is all of a sudden looking like a chair.

On top of the springs you add burlap...


And then you made edge roll. An edge roll is a burlap stuffed with cotton (rolled and stitched) and added to the edges of the chair to start creating soft edges...


Now, the front edge roll actually came from the original upholstery of the chair. It is not made from cotton stuffing but a cork tube. This will help keep the shape of the front of the chair. Now, to keep that in place, I had to stitch it onto the burlap covered seat...


When I was done adding the burlap and the edge rolls, I had to stitch the springs to the burlap. This is to make the springs move with the burlap when somebody sits on the chair. This is just a quick basting stitch, so there isn't much rhyme or reason other than the fact that you have to catch 3 spots on each spring...


(You only have to catch 2 spots on each of the back springs since they don't see as much action as the seat.)

Once all of that is done, you move onto the cotton and foam. Unfortunately, I forgot to take photos of these stages. But from there, you add the muslin. Now, if you send something out to get upholstered, they may or may not use muslin, but for us in class , it is like a dry run before we cut our expensive fabrics!


E voila... it's looking like a chair all of a sudden! And at this phase, I couldn't stop sitting on it. I know, silly, but damn it's was more comfortable than I thought would be!
Locations of visitors to this page